
 Posted By
Bajarangi soft ,
Posted On 06-10-2020
Posted By
Bajarangi soft ,
Posted On 06-10-2020
1.Different Types of Custom forms are Check Boxes.Radio Buttons,Inline Forms
<!DOCTYPE html>
<html lang="en">
<head>
<title>Bootstrap Example</title>
<meta charset="utf-8">
<meta name="viewport" content="width=device-width, initial-scale=1">
<link rel="stylesheet" href="https://maxcdn.bootstrapcdn.com/bootstrap/4.5.2/css/bootstrap.min.css">
<script src="https://ajax.googleapis.com/ajax/libs/jquery/3.5.1/jquery.min.js"></script>
<script src="https://cdnjs.cloudflare.com/ajax/libs/popper.js/1.16.0/umd/popper.min.js"></script>
<script src="https://maxcdn.bootstrapcdn.com/bootstrap/4.5.2/js/bootstrap.min.js"></script>
</head>
<body>
<div class="container mt-3">
<h2>Custom Checkbox</h2>
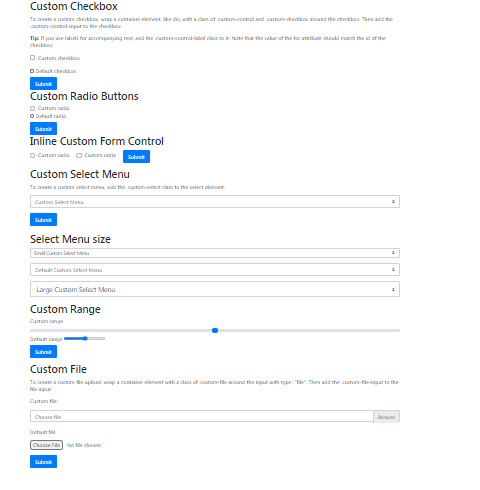
<p>To create a custom checkbox, wrap a container element, like div, with a class of .custom-control and .custom-checkbox around the checkbox. Then add the .custom-control-input to the checkbox.</p>
<p><strong>Tip:</strong> If you use labels for accompanying text, add the .custom-control-label class to it. Note that the value of the for attribute should match the id of the checkbox:</p>
<form action="/action_page.php">
<div class="custom-control custom-checkbox mb-3">
<input type="checkbox" class="custom-control-input" id="customCheck" name="example1">
<label class="custom-control-label" for="customCheck">Custom checkbox</label>
</div>
<input type="checkbox" id="defaultCheck" name="example2">
<label for="defaultCheck">Default checkbox</label>
<br>
<button type="submit" class="btn btn-primary">Submit</button>
</form>
<h2>Custom Radio Buttons</h2>
<form action="/action_page.php">
<div class="custom-control custom-radio">
<input type="radio" class="custom-control-input" id="customRadio" name="example1">
<label class="custom-control-label" for="customRadio">Custom radio</label>
</div>
<input type="radio" id="defaultRadio" name="example2">
<label for="defaultRadio">Default radio</label>
<br>
<button type="submit" class="btn btn-primary">Submit</button>
</form>
<h2>Inline Custom Form Control</h2>
    <form action="/action_page.php">
        <div class="custom-control custom-radio custom-control-inline">
            <input type="radio" class="custom-control-input" id="customRadio1" name="example1">
            <label class="custom-control-label" for="customRadio1">Custom radio</label>
        </div>
        <div class="custom-control custom-radio custom-control-inline">
            <input type="radio" class="custom-control-input" id="customRadio2" name="example2">
            <label class="custom-control-label" for="customRadio2">Custom radio</label>
        </div>
        <button type="submit" class="btn btn-primary">Submit</button>
    </form>
</div>
</body>
</html>
<!DOCTYPE html>
<html lang="en">
<head>
    <title>Bootstrap Example</title>
    <meta charset="utf-8">
    <meta name="viewport" content="width=device-width, initial-scale=1">
    <link rel="stylesheet" href="https://maxcdn.bootstrapcdn.com/bootstrap/4.5.2/css/bootstrap.min.css">
    <script src="https://ajax.googleapis.com/ajax/libs/jquery/3.5.1/jquery.min.js"></script>
    <script src="https://cdnjs.cloudflare.com/ajax/libs/popper.js/1.16.0/umd/popper.min.js"></script>
    <script src="https://maxcdn.bootstrapcdn.com/bootstrap/4.5.2/js/bootstrap.min.js"></script>
</head>
<body>

<div class="container mt-3">
    <h2>Custom Select Menu</h2>
    <p>To create a custom select menu, add the .custom-select class to the select element:</p>
    <form action="/action_page.php">
        <select name="cars" class="custom-select mb-3">
            <option selected>Custom Select Menu</option>
            <option value="volvo">Volvo</option>
            <option value="fiat">Fiat</option>
            <option value="audi">Audi</option>
        </select>
        <button type="submit" class="btn btn-primary">Submit</button>
    </form>
</div>
<br><div class="">
    <h2>Select Menu size</h2>
        <select class="custom-select custom-select-sm mb-3">
            <option selected>Small Custom Select Menu</option>
            <option value="volvo">Volvo</option>
            <option value="fiat">Fiat</option>
            <option value="audi">Audi</option>
        </select>
        <select name="cars" class="custom-select mb-3">
            <option selected>Default Custom Select Menu</option>
            <option value="volvo">Volvo</option>
            <option value="fiat">Fiat</option>
            <option value="audi">Audi</option>
        </select>
        <select name="cars" class="custom-select custom-select-lg mb-3">
            <option selected>Large Custom Select Menu</option>
            <option value="volvo">Volvo</option>
            <option value="fiat">Fiat</option>
            <option value="audi">Audi</option>
        </select>
<h2>Custom Range</h2>
    <form action="/action_page.php">
        <label for="customRange">Custom range</label>
        <input type="range" class="custom-range" id="customRange" name="points1">
        <label for="defaultRange">Default range</label>
        <input type="range" id="defaultRange" name="points2">
        <p><button type="submit" class="btn btn-primary">Submit</button></p>
    </form>
</div>
</body>
</html>
<!DOCTYPE html>
<html lang="en">
<head>
    <title>Bootstrap Example</title>
    <meta charset="utf-8">
    <meta name="viewport" content="width=device-width, initial-scale=1">
    <link rel="stylesheet" href="https://maxcdn.bootstrapcdn.com/bootstrap/4.5.2/css/bootstrap.min.css">
    <script src="https://ajax.googleapis.com/ajax/libs/jquery/3.5.1/jquery.min.js"></script>
    <script src="https://cdnjs.cloudflare.com/ajax/libs/popper.js/1.16.0/umd/popper.min.js"></script>
    <script src="https://maxcdn.bootstrapcdn.com/bootstrap/4.5.2/js/bootstrap.min.js"></script>
</head>
<body>

<div class="container mt-3">
    <h2>Custom File</h2>
    <p>To create a custom file upload, wrap a container element with a class of .custom-file around the input with type="file". Then add the .custom-file-input to the file input:</p>
    <form action="/action_page.php">
        <p>Custom file:</p>
        <div class="custom-file mb-3">
            <input type="file" class="custom-file-input" id="customFile" name="filename">
            <label class="custom-file-label" for="customFile">Choose file</label>
        </div>

        <p>Default file:</p>
        <input type="file" id="myFile" name="filename2">

        <div class="mt-3">
            <button type="submit" class="btn btn-primary">Submit</button>
        </div>
    </form>
</div>

<script>
    // Add the following code if you want the name of the file appear on select
    $(".custom-file-input").on("change", function() {
        var fileName = $(this).val().split("\\").pop();
        $(this).siblings(".custom-file-label").addClass("selected").html(fileName);
    });
</script>

</body>
</html>